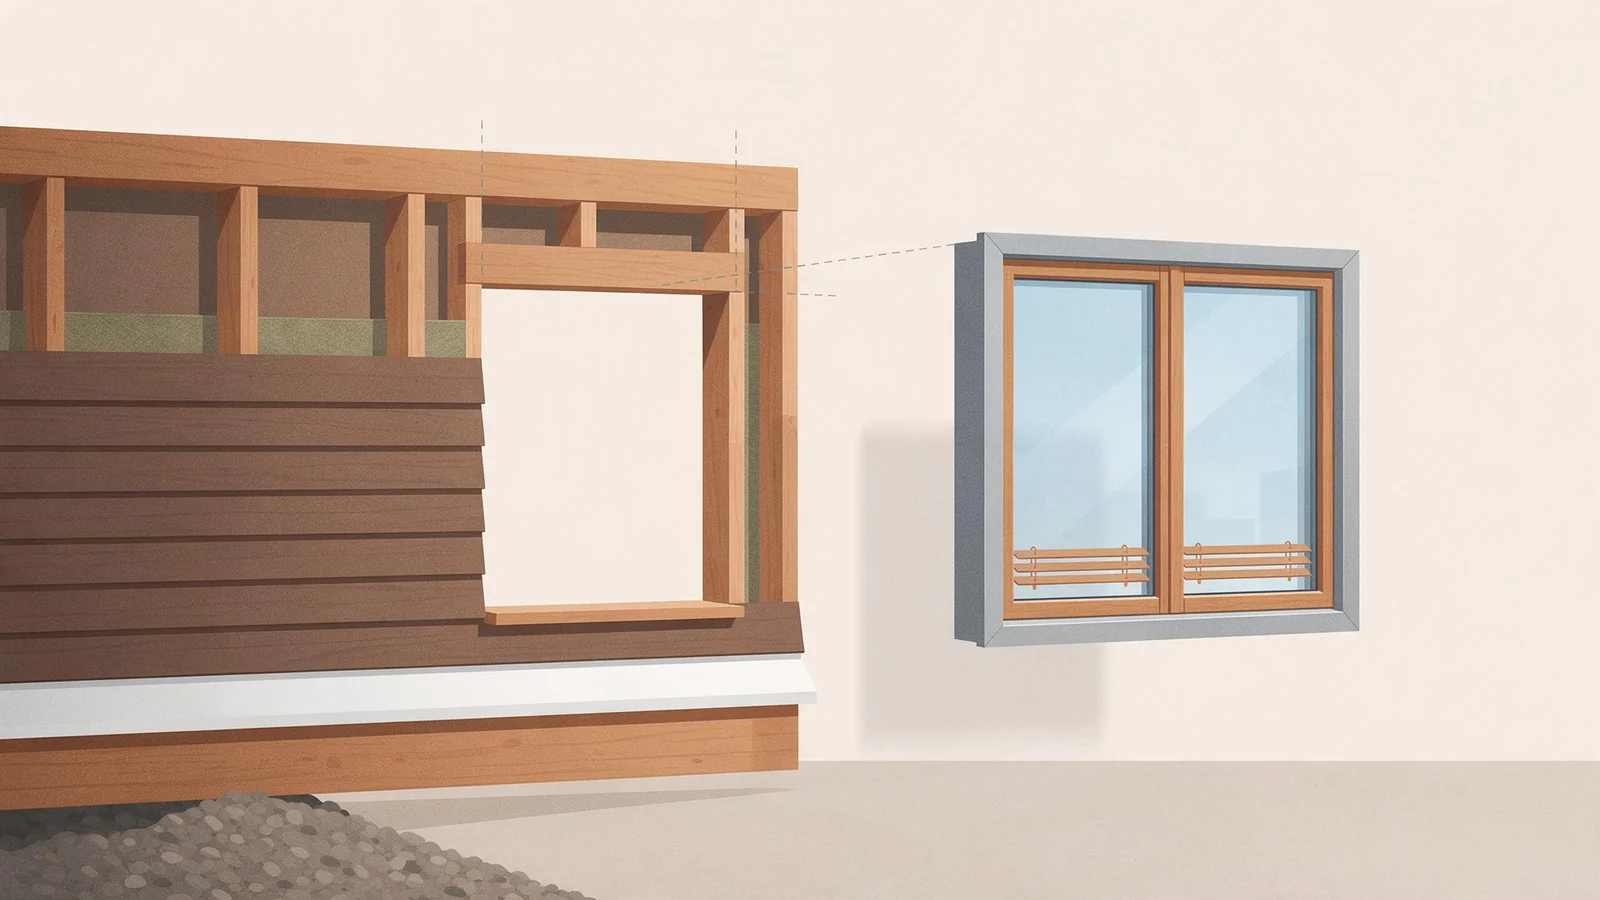
What Is a Window Rough Opening?
On a framing plan, the rough opening is the hole left in the stud wall for the window, measured between framed members and never from anything finished. Across the top runs the header. Underneath sits the rough sill, and each side is a jack stud nailed to a full-height king stud. The header carries the wall load over the gap and passes it down through the jacks, which is why nobody on site wants to trim them once they are up. The window itself is made smaller than that hole on purpose.
Where does the difference go? Shims under the frame and at the fixing points, then insulation and sealant around the perimeter. That gap is also the only room an installer has to bring a unit level and plumb when a stud has bowed or the rough sill sits a little high at one end, and it leaves space for the wall to move a little over the years without pressing on the frame. So put two sizes on every order line, the unit size and the rough opening it goes into, and have the site confirm the second one before production starts. Mix the two up and a batch of windows either rattles in its openings or does not go in at all.
Standard Rough Opening Size Formula and Clearance
Most builders start by making the rough opening 1/2 inch larger than the window, width and height. Center the unit and you get 1/4 inch on each side. Published trade guidance calls that the standard allowance for residential windows. A window 24 inches wide by 36 inches tall needs an opening around 24-1/2 by 36-1/2 inches.
Some manufacturers want more clearance than that, and installation clips are the usual reason. You may need a 1/2 inch gap on all sides, and the same goes for mulls installed in the opening or when a sill pan drainage system is part of the plan. A window maker's sizing statement lists these cases and makes it plain that the standard minimum gap is 1/4 inch unless the buyer says otherwise. Check with the window supplier before you frame anything.
Clearance is what lets you get the window level and keeps the frame from being pinched. Too little room and shimming becomes a fight, too much room and sealing gets difficult, which hurts thermal performance. The 1/4 inch per side rule works for most installers because it sits right between those two problems.
How to Measure a Rough Opening Correctly
Take the width at the top, middle, and bottom. Use the smallest number. Do the same for height: left, center, right, smallest again. That covers you when framing is a little out of square. A complete guide to rough openings calls this three-point method standard practice.
Measure the opening itself, never the trim. Trim runs wider and will throw your numbers off. Use a steel tape, and go through it twice. Before writing anything down, check plumb and level. If the wall is out of plumb, the window can bind or not operate right even when the rough opening measures fine.
On a new build with no window in place, buy the window first. Frame to the manufacturer's recommended size. Otherwise you end up ordering a window that won't fit the rough opening you already framed.
Window Size Codes and Nominal Sizes Explained
Builders talk in four-digit size codes. The first two digits give the width in feet and inches, the last two give the height the same way. That number is nominal. It is not the frame size, and it is definitely not the rough opening.
Nominal, frame, and rough opening are three separate numbers, and they never line up. Nominal is the rounded callout, so 3050. Frame size is what the unit actually measures across the outside, and it runs a bit smaller than nominal. The rough opening is the hole in the wall. It has to be bigger than the frame so you have room to shim and seal without fighting it. Same code, different manufacturers, and you can end up with different actual dimensions because each one uses its own frame profiles and clearances. When you are ready to frame or order, get the exact frame size and the rough opening they recommend from the supplier for the code in front of you.
Window Rough Opening Size Chart for Common Window Types
These numbers are what people usually frame to, and they work as a planning guide, not a spec. Before you cut any studs, pull the actual dimensions from your window supplier because manufacturers and product lines vary.
| Window Type | Nominal Size (W x H) | Typical Rough Opening (W x H) |
|---|---|---|
| Single Hung | 24 x 36 | 24-1/2 x 36-1/2 |
| Double Hung | 30 x 60 | 30-1/2 x 60-1/2 |
| Casement | 32 x 60 | 32-1/2 x 60-1/2 |
| Sliding | 36 x 80 | 36-1/2 x 80-1/2 |
| Picture | 36 x 36 | 36-1/2 x 36-1/2 |
That half inch of clearance holds for most aluminium and uPVC units too, but slim frame or thermally broken systems sometimes want a different gap, so check the sizing chart for the line you are ordering. If you want to see what we carry, head to our aluminium windows and uPVC windows and doors pages.
Preparing the Rough Opening Before Installation
Plumb and level the wall before the window goes in. Put a level on the king studs and the header. If the opening is out, the window binds or leaks, and you will fight it forever. Angle the sill slightly downward to the outside so water drains away from the building, and put a back dam on the sill to stop water from getting inside. Those two details work together to keep the wall dry.
Flashing and sealing are part of this too. Flash the opening at the sill, sides, and head, following the window manufacturer's instructions, and the flashing goes on before the window is set. Flash correctly and water moves out and away from the frame. Sealant comes after the window is installed, not before.
What to Do If the Rough Opening Is Too Big or Too Small
Too big, and you nail strips of lumber or plywood to the sides, top, or bottom until you get back to about 1/4 inch per side. For larger gaps, use solid wood or plywood, not just shims. Too small? Take material off the sill before you touch the header. The header carries the structural load from above, so cutting into it is asking for trouble. On load-bearing walls, talk to a structural engineer before you enlarge any opening.
Once the window is set, fill the remaining gap with backer rod and sealant, or use low-expansion spray foam. Backer rod keeps the sealant at the right depth and stops three-sided adhesion, which matters more than you'd think. Low-expansion foam insulates and seals without bowing the frame. But if the framing is badly out of square or the opening is off by more than an inch, calling a professional installer is often the better move.
Rough Opening Considerations for New Construction vs. Replacement Windows
Buy the window before you frame on new construction. That order of operations saves more headaches than any other. Then build the opening to the manufacturer's recommended rough opening size. For replacement windows, measure what is there and order a window that fits with proper clearance. Out of square openings might need a slight adjustment.
Installation methods differ. A new construction window usually carries a nailing fin that attaches to the outside of the framing. Replacement windows are often set from the inside and secured through the frame. Flashing details change too, so follow the manufacturer's instructions for the window and installation type you have.
Common Mistakes to Avoid When Measuring and Framing Rough Openings
Someone measures the trim and ends up with a window too wide for the hole. Trim is wider than the rough opening, because it has to cover the gap. An out of square opening looks fine if you only take one width and one height, but one corner can be off. So you measure at three points and order for the smallest dimension you find.
Some windows need more than 1/4 inch per side, especially when installation clips or mulls are involved. Ignore the manufacturer clearances and you will be back on site fixing it later. Skip checking plumb and level before the window arrives and it binds or leaks. Verify the opening first.